The sections below will provide an overview of how to write a package XML file. For more detailed information about the XML tags, including advanced attributes, please see the reference section at the end of this document.
As explained earlier, all commands for installing and
uninstalling a package are organized into six logical steps:
preparation,
configuration,
compilation,
installation,
completion, and
uninstallation. The
uninstallationstep is optional, but recommended.
These steps are essentially equal, except that configuration
files are sent to the remote machine between the
preparationand
configurationsteps. It is highly recommended
that packagers take advantage of the six steps for logically
grouping the package commands. Future version of the the ReST
suite may contain optimizations or changes in the handling
of these steps and forward compatibility is best ensured by
using these steps. Below is an example of the six steps
appearing in the package xml as seen in Figure 2.6.
Example 2.2. The 6 Steps
<preparation> <command value="tar -xf
example.tar"> <command value="cd example/">
</preparation> <configuration> <command
value="./configure --prefix=$PWD">
</configuration> <compilation> <command
value="make all"> </compilation>
<installation> <command value="make install">
</installation> <completion> <command
value="make clean"> <command value="cd ..; /bin/rm -f
example.tar"> </completion> <uninstallation>
<command value="cd example"> <command value="make
uninstall"> <command value="cd ..; /bin/rm -rf
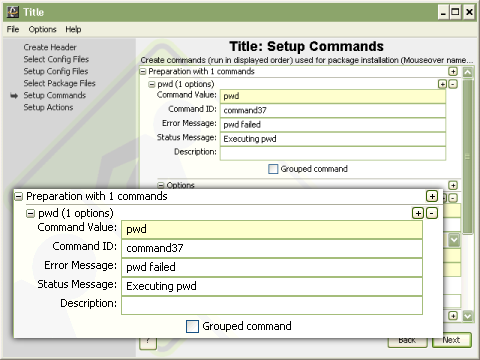
example/"> </uninstallation>Package commands makeup the heart of rest packages. Commands are run in the bash shell and as seen in Figure 2.7 have several attributes. The most important attribute is the command value. The command value is that actual command that will be executed. Options for the command may be included in the command value but are better left as a command option included with the command. The description is the next most important value showing up as a tooltip when the Installer user modifies the command. It allows the packager to provide further information to the user as to the purpose of the command and what the user might decide to do with the command. The Command ID will be automatically generated by the packager, but should be customized for better interoperability with the Installer scripting mechanism and upcoming features of the ReST Tool Suite. The error message is displayed to the user associated with the machine the command failure occurred. The status message is displayed on the machine the command is running.
Some commands may need to be configured by the user
before they are run on the remote machine. For that reason
the ReST XML allows
commandtags to contain
optiontags. The
optiontags define
command-line arguments for a given command and can be
configured by end users. A good example of a command that
will likely contain options is the
./configurescript, which is included in many
source distributions. It is common for this command to have
many different command line options for properly configuring
the build process. Below is an example of the
./configurecommand with options.

Example 2.3. Command Option XML
<command value="./configure" grouped="true">
<option name="foo" type="text"
default="/usr/local/lib/libfoo.a"
truevalue="--with-libfoo="/> <option name="bar"
type="boolean" default="false" truevalue="--with-libbar"
falsevalue="--without-libbar"/> <option
name="ouputlevel" type="choice" choices="debug,view,none"
default="none" truevalue="--with-outputlevel "/>
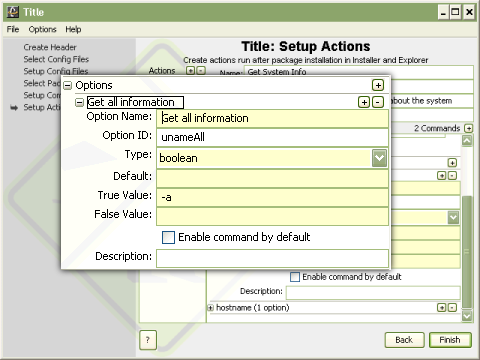
</command>The above example defines three possible options for
the
./configurecommand. All of the options have four
common attributes: name, type, default, and truevalue. The
name attribute is exactly what would be expected, the name
that the user will see when configuring this option. The type
attribute may be either
string,
boolean, or
choice. The default attribute defines what the
value should be by default, which is required for
installation in simple mode. Finally the truevalue attribute
defines what is appended to the command if the option is
enabled or if a option of type boolean is selected. For
example, if option
foois enabled and the default value is left
untouched the resulting string
--with-libfoo=/usr/local/lib/libfoo.awill be
appended to the command. Packagers are encouraged to expose
all possible command-line options to the users through ReST
as the packager is more knowledgeable about the software
included than the user. Additional information about the
optiontag can be found in
the reference section at the end of this document.
ReST actions are commands that exist on systems after a
software package has been installed. For a piece of server
software, for example, this could include starting, stopping,
and restarting the server. An
actionis simply a wrapper
around one or more
commandtags, much like
each of the six steps described above, except that the
actiontag requires a name
for the action. Actions can be run by the ReST Installer
immediately after installation is complete or by the ReST
Explorer at any time after package installation. Below are
pictures of the Action setup GUI and an XML example of a
package action.
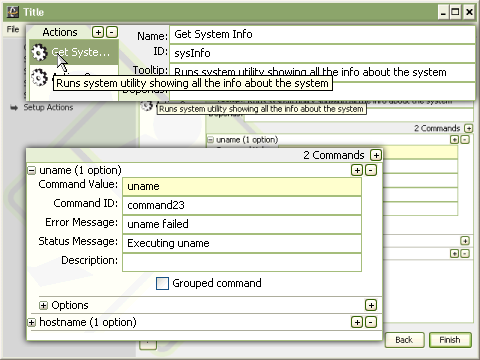
To add an Action to the package, click on the + button on the top right next to the "Actions" label (Figure 2.9). This will add an action to the list below the actions label. The action attributes can be set in the form to the right of the Actions + and - buttons. All value of the action, Name, ID, Tooltip and Description should be entered. Added commands to and actions is done the same way as to the six command sections and the action commands may also have command options that are also added in the same manner as in the "Setup Commands" panel (see Figure 2.10).
Example 2.4. Package Actions XML
<actions> <action name="Start Server"
        tooltip="Start a server."> <command value="/bin/bash
        ./start_server.sh" statusmsg="Starting Server"
        errormsg="Failed to start server."/> </action>
        <action name="Kill Server" tooltip="Kill a server.">
        <command value="/bin/bash ./kill_server.sh"
        statusmsg="Killing Server" errormsg="Failed to kill
        server."/> </action> <action name="Restart
        Server" tooltip="Restart a server."> <command
        value="/bin/bash ./kill_server.sh" statusmsg="Killing
        Server" errormsg="Failed to kill server."/> <command
        value="/bin/bash ./start_server.sh" statusmsg="Starting
        Server" errormsg="Failed to start server."/>
        </action> </actions>